Pages

Friday, June 29, 2012

Clean your microwave... without Chemicals

Clean Your Microwave Without Chemicals!

What???????  Without chemicals?  Thats right, and its super easy!

You will never scrub your microwave again!  And then you will love me, you will wonder how you went through life never knowing this trick and you will tell all your friends.  Serious! 


Here it is, 

Place a glass of water in the microwave.  Just water, place in the microwave for 5 minutes.  

When the microwave beeps wipe down with a sponge.  (And don't forget to use a hot pad, the glass WILL be hot and the water will be boiling.)

Done, it works every time to get off even the most baked on grime.  


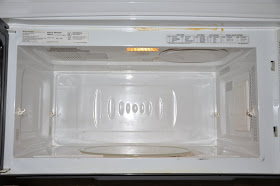
See, here is the microwave pre water treatment, 


And here it is after.  Soooo pretty!  


This seriously works every time!  For even the most stuck on, grimy, greasy, messy microwave.  Serious, I even use it on the microwave at work!  


If you really want to make sure it is clean you can bleach your sponge prior to the cleaning.  

Happy cleaning!
-Sarah


Thanks so much for stopping by! If you liked Yuen Yarn, check out some of our older posts,
Like us on Facebook, or Follow Me on Pinterest

Thursday, June 28, 2012

Camping... Just the Girls!


Camping with the Kids...

We decided to go camping last weekend with the kids.  


 As soon as we got there the kids jumped in the water.


It was frigid!

Like, straight off the snowbank cold.

Like, I can't believe it isn't solid cold!
 But the kids loved it anyway.


We had sooooo much fun.  Our favorite camping spot is one with a creek running through it.  It is far enough away from other campers that you can't hear them, and there is a small island in the middle of the creek with a bridge that the kids can walk across to play.  They loved it.  It's an adventure every time they cross it.  


We go fishing,


Riding...


And just plain old have fun!

 But as the weekend was drawing to a close and my husband had to go back to work the girls were getting sad that we all had to go home.

I thought, why not stay... why not... the camper is already here, there is food, water, cloths, what the hey!?!

So, now the girls and I are camping, just us, no husband in sight... nerve-racking?, a little... but seriously we can do this!  AND... Awesome girl bonding time! 

See, here we are gathering fire wood...


Usually we will go for rides on the 4 wheelers and bikes but this trip, with just the girls, I thought we didn't really need it, we would go for walks and keep mostly to ourselves at camp.  

What fun, we really didn't even leave camp for 2 days.  The kids would walk back and forth on the island making up games and I followed behind them trying to keep up.  

Here are the girls with their first taste of a frozen Capri Sun.  Did you ever have those as a kid?  We used to LOVE them!  

The only problem for Mommy, ummm, have you ever tried to sleep in a camper for a week?  The days that we were alone, rather than try and share my bed with the little ones, I decided to let them sleep in my bed, with the memory foam mattress and extra padding, and I slept on the fold out couch.  NOT a good idea, I repeat, POOR, POOR PLANNING!!!  Oh, my aching back and hips.  


But look at how cute they are, all snuggled together like that.  I couldn't move them!         
Those are a couple of tired girls!  

Oh, but the kids had sooooooo much fun, they loved it, and made it all worth it!  

And, I have to work this weekend but they are going back with Daddy!  They are going to be worn out little girls!  

Happy Summer, 
-Sarah 


Thanks so much for stopping by! If you liked Yuen Yarn, check out some of our older posts,
us on Facebook, or Follow Me on Pinterest

Monday, June 25, 2012

10 Minute Biscuits

Baking Powder Biscuits

As long as I can remember I have made these.  They are seriously soooo easy and delish!  My husband reminded me the other day that we hadn't had them in a while.  He not only eats them with dinner but then has them for dessert with butter and peach jam.  

Here is the easiest biscuit recipe you will ever have...

10 Minute Biscuits

2 cups flour
1 Tbsp baking powder
1 tsp salt
1/4 cup shortening
3/4 cup milk


Mix all dry ingredients.


cut in shortening


mix in milk


Roll out the dough and cut into biscuits,


Bake in oven at 450 degrees for 10 minutes.  

Ok, maybe it takes 12 minutes.  The 2 extra minutes are to gather ingredients and put them all together.  


I used half whole wheat flour and half white flour, which is why they look a little differnt here.

Your going to love them, just like our family does and you will make them when your in a pinch for a starch with your meal, or when your looking for something sweet after dinner with butter and jelly.  (I think that is my husbands favorite, eat them with dinner, then as dessert too!)  Enjoy!

-Sarah

Thanks so much for stopping by! If you liked Yuen Yarn, check out some of our older posts, follow us on Facebook, or Follow Me on Pinterest

Friday, June 22, 2012

Roasted Kale

Kale Chips

Have you ever had kale chips?  I mean homemade, delicious, crunchy, wonderful kale chips?

I absolutely can not get enough of them.  And they are super healthy!!!  What a great way to get in a 'great for you' snack too.  

So to make these delicious treats, here's what you do...


Oven Roasted Kale

Kale
Olive oil
salt
Pepper

  1. pull the kale off the stem
  2. place on pans
  3. put in oven at about 420 degrees for 20-25 minutes, turning once half way through.  


Thats it, super easy!

Here they are straight out of the oven.

And you will fall in love with them as I have!  They are crunchy and delicious, they will melt in your mouth, they are salty and wonderful.  Can you tell I can't get enough.  

Ok, I have to go eat some now...
-Sarah


Thanks so much for stopping by! If you liked Yuen Yarn, check out some of our older posts, like us on Facebook, or Follow Me on Pinterest

Wednesday, June 20, 2012

DIY Detangler spray

Detangler.. Oh Detangler... Where fore art thou Detangler...

We need you in this house.  There is no going back, we couldn't make it even half way through the day if we don't have you.

As I was brushing the girls hair the other day I ran out of detangler spray.  Aaaaagghhhghhh!!!!!!  I don't know if you have to brush little girls hair in your house but let me tell you it is painful, for all parties involved.  There is no way I could brush thier hair without a decent detangler, but I was just not in a way to go to the store.  You know how it is sometimes, you really are not going to the store at 8:30 at night in the middle of bedtime routine for detangler, not happening!  But I digress...

I thought, I wonder how it would work to make my own, right.

Sooooo...

Here it is and it is fabulous...

DIY Detangler Spray
All you need is:

-leave in conditioner cream
-an empty spray bottle
-water


Mix about 1-2 Tbsp leave in conditioner and water in the spray bottle and VIOALA!!!!  Instant fix.

See, how much easier could it be.  And it works like a champ.  I don't buy De-Tangler anymore.  And the best part, super cheep!  This bottle of leave in conditioner spray is only like $3.  And how long will that last when your only using 1 Tbsp at a time.  LOVE IT!

Side note - if you have purchased detangler that just isn't cutting it in your little ones hair, try adding additional leave in conditioner, it will make your life much, MUCH easier!  (I have purchased detangler spray from the dollar store previously and was sorely disappointed.  My girls have very thick hair and unfortunately the dollar store brand just didn't cut it.  Now if they had thinner hair I think it would have worked just fine.  But adding just a bit more conditioner worked wonders!)


Happy saving!
-Sarah

Thanks so much for stopping by! If you liked Yuen Yarn, check out some of our older posts, like us on Facebook, or Follow Me on Pinterest

Monday, June 18, 2012

DIY cold packs for the kiddos

DIY Cold Packs


I don't know about your house but here for every bump, scrape, bash or bruise a cold pack is wanted needed, absolutely positively necessary!  There never seem to be enough around here so I thought, why not make my own.  

I wanted one with a removable cover so I could wash it as needed.  I wanted it to be that great jelly consistency like the ones you can buy, but I wanted to know what was in it so when it gets punctured I know what is leaking on my children.  I did a bit of research and found they are relatively simple!  (Yeah!!!)

So here is the recipe...

Cold Packs with a removable cover...

All you will need is...
  • 1 cup water
  • 1 cup rubbing alcohol
  • 2 sandwich bags
  • and a piece of cloth large enough to cover the sandwich bags


mix your rubbing alcohol and water together and put in a sandwich bag.  I double bagged it just incase it decided to leak on me.  


place in the freezer and wait.  

(After about 4 hours it was cold and feeling kind of squishy but it didn't get the jelly like consistency until I waited overnight)


While you are waiting you can make your cover.  


Take you strip of fabric and fold it over to make a sort of envelope with right sides together.  Sew the edges on both sides and flip it inside out.


slip the cover onto the frozen water combo...


Presto!!


See, easy peasy, right!?!  And the kids love it.  This is a piece of fabric I had but I really think the kids would love one with their favorite character on it.  That will be next!

Thanks, 
-Sarah

Thanks so much for stopping by! If you liked Yuen Yarn, check out some of our older posts, or Follow Me on Pinterest

Thursday, June 14, 2012

A bugs life

A Sunny Day In Seattle...

Slugs are gross. I just have a hard time with their slimy little bodies. I have to put my feelings aside, however, becasue my daughter likesLOVES bugs; all kinds too. We were enjoying a rare warm and sunny day in Seattle, I'm pretty sure the baby was sleeping, when Falon found her watering can in the middle of the yard. It rained, as usual, for days before this and she casually picked up her bucket to play in the sand box. When she approached the deck it was like she'd struck gold. "Mommy, Mommy, Mommy, LOOK AT THIS!" She squweels at me. I come running thinking she has discovered the cure for cancer...and this is what I was shown.


A slug, not huge really but about an inch long.

(On a side note, we went for a walk at a nearby park recently and I was reminded about the "Daddy Slug in outside back." The one at the park could have purchased real estate and opened a pharmacy.)
She was facinated and I just loved watching her watch them. I was told it was a daddy slug. She also found a mommy slug (which was bigger than the "daddy" thanks for that...) and a baby slug inside the watering can. Wow.
I love this pic, her tiny little hand trying to be so gentle with the slug.
I think that the mommy and the daddy joined together in this one.

Almost had the courage to touch this one, but then not.
Oh yeah, and then she accidentally touched them and they curled up a little. She told me to be quiet because they were now sleeping.

Thanks for the memories Slug.

-Lil Sis


Thanks so much for stopping by! If you liked Yuen Yarn, check out some of our older posts, or Follow Me on Pinterest