Pages

Friday, September 28, 2012

Charly's 1st Camera

Charly's New Love

Apparently it's genetic. Charly has been dying to take pictures lately so we decided to give her my old one. It is a pretty simple point and shoot camera. We thought she would really love it. So daddy wrapped it up, made her close her eyes, and hold out her hands.
 Now close your eyes, are they closed?

 Hold out your hands...

Dont open them yet... 

Ok, you can open them! 

 Here you go baby, your very own camera!

 Here daddy is showing her how to work it. 

She was so stinkin' excited!

She has been taking picture of everything. And I do mean everything! She loves taking pictures of her sparkle boots, and her favorite movies, her sister doing ANYTHING.


That is mostly what I find, boots, movies and doodle, some of her eyes, at an odd angle of course.


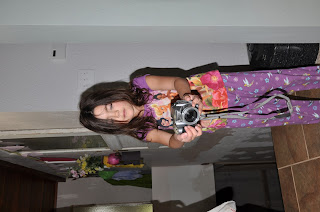
However, some of her pictures have been really great. It is funny how adults will do the strangest things in front of a child. Things, funny faces, weird poses. Like this one of me, don't worry, I wont incriminate anyone else.

It has been really great to see some of the pics she has gotten. Her memory card was full after just 2 days. I couldn't believe it. She is loving being a mini photographer! And I am so excited for her to be loving taking pictures with me.


Hope your littles ones love doing the things you do too!
-Sarah

Thanks so much for stopping by! If you liked Yuen Yarn, check out some of our older posts, Like us on FacebookFollow Me on Pinterest ,visit our ETSY shop or come see our website www.yuenyarn.com.


Thursday, September 27, 2012

DIY Travel Snack Containers

Travel Snack Containers

As we were about to leave the house for my parents house one day I was packing for the long trip and I wanted fun containers for the kids to have their snacks in. I found some leftover crystal lite containers and thought they would be perfect. I liked that they had a lid and were easy enough that the kids could do it in the back seat by themselves.

So, I also wanted to give you an idea of how I craft at home.  Some people like the sanctuary of a great craft room (which I have by the way) but I prefer to wait until the kids go to bed and craft like this.
Thats right, sacked out in front of the TV with my feet kicked up on the ottoman listening to the tube.  This is my happy place, hopefully I don't need a flat surface to do my crafting for the night.

I just thought I would share that with you.  I knew you would be interested.

Anyway...

Here is how I made the Travel Snack Bins:


All I did was pick out some cute paper.


Peeled off the plastic wrap.


Measure my paper,


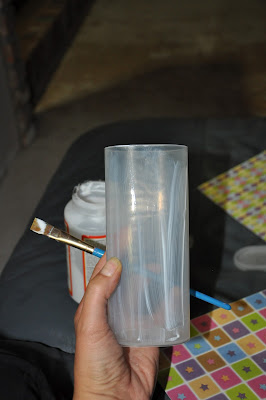
Paint mod podge on the outside,


Paste paper on it

And mod podge over the top.


Now just let dry and done.

The kids lived having cute smak containers in the backseat and I didn't have to mess with it since I was driving alone. Made my life way easier!

Any old plastic container will do but I liked this size because I could fit a nice amount of cereal in it or even some breakfast bars because they are tall enough! {sweet}


Happy travels all,
-Sarah

Thanks so much for stopping by! If you liked Yuen Yarn, check out some of our older posts, Like us on FacebookFollow Me on Pinterest ,visit our ETSY shop or come see our website www.yuenyarn.com.

Tuesday, September 25, 2012

Cake Stand

Up-Cycled Candle Holder


For the last couple of birthday parties I have had to borrow a cake stand. So I finally decided to make my own.


It all started with an afternoon of thrifting...

I found this perfect candle holder for about $0.50! Super great, right!?!

I wanted to paint it a different color if course but it is perfect for my purposes. I also found these great saucers that I knew would be fabulous!

All I had to do was spray paint the candle holder any color I wanted. I went with pink of course. After all I have 2 girls.


I used my E-6000 to glue the saucers to to the tops of the candle sticks.


And viola!! Done. And isn't it great? All I had to do was wait for it to dry.  Well, and now I have to wait for another party to use it, but I am SUPER excited!

Love it!
-Sarah

Friday, September 21, 2012

Tea Cup Pin Cushion (in like 5 minutes)

5 Minute Tea Cup Pin Cushion Gift

So I found these tea cups at the local Good Will and wanted to make something really great with them but I wasn't sure what.  I did some thinking and came up with this.  


A super cute Tea Cup Pin Cushion!  Don't you just love it?

So this is what I did...

You will need

  • some batting (a hand full will do)
  • a cute tea cup and saucer
  • your favorite matching fabric
  • a hair tie or ribbon or whatever to tie it shut
  • glue


First grab your batting, bunch it up, and place it in the middle of your fabric.  Now tie it shut, it is much easier with a hair tie but if you don't have one ribbon will do, or a rubber band...


Now place some glue on the inside of the tea cup.


Place your cushion on in the cup.


Glue your tea cup to the saucer.


And glue some magnets to the bottom of the saucer.


And done, like 5 minutes, seriously!


And your friends are going to think you are super cool.  They are going to LOVE it.


Happy gifting, 
-Sarah 


Thanks so much for stopping by! If you liked Yuen Yarn, check out some of our older posts, Like us on Facebook, Follow Me on Pinterest ,visit our ETSY shop or come see our website www.yuenyarn.com.

Thursday, September 20, 2012

Dehydrated Peaches

Dehydrating Peaches... Yeah!


Again on my favorite subject, peaches. These are so easy to prepare and they last forever. Well, only until you eat them all. My mom would try sooo hard to keep them through the winter but alas, I don't think they ever made it past November. They are like crack for me, my vice, the one thing I can't live without. Seriously, they are that good!

So, without further ado...

How to Dehydrate Peaches

All you will need is:
peaches
Lemon juice
Water

So, if you want you can blanch them but I don't find it necessary. But it is all up to you.

Now, to make your life easier make sure to buy 'freestone'. These are the type of peaches they don't stick to the pits. They ripen a little late in the season and there is tons of information out there about what variety is freestone or if you are lucky enough to live near an orchard they are always more than happy to fill you in on varieties.

FYI: this year we got 'Summer Lady' peaches. And they are fabulous. I could fill volumes on the different varieties I prefer but I won't bore you.

So, cut you peaches in half, remove the pit, and slice. I used a mandolin but it is not necessary. You don't want them too thin or they will stick to the trays in the dehydrator.


As you are slicing them place them in a 10:1 solution of water to lemon juice. Or approximately. You know how I hate to measure.


After they have been through a dip in the lemon water place them on your dehydrating trays and done.

Now just wait. Timing will depend on your particular dehydrator. Mine is about 6 hours for 6 trays.


Done! Woot woot...

Happy dehydrating,
-Sarah


Thanks so much for stopping by! If you liked Yuen Yarn, check out some of our older posts, Like us on FacebookFollow Me on Pinterest ,visit our ETSY shop or come see our website www.yuenyarn.com.

Wednesday, September 19, 2012

Peach Sauce

Peach Sauce (you know, like Apple Sauce but with Peaches)


So I LOVE peaches! No seriously, like I can't live without them.  One of my best childhood memories is picking peaches in the summer with family. We had so much fun!

I love all things peach. Canned, in jam form, dehydrated, sauce, fruit leather, whatever else you can think of, I love it! I even have peach lip gloss and lotion. I really can't get enough.

I may need an intervention, but we won't talk about that.

Any who...

Today made some peach sauce, you know like apple sauce but with peaches. Quite frankly I can eat this all by itself but it has a million other uses also.

Like:
eat it plain, ok i already said that.
Freeze it an put it in smoothies
Keep it for baby food if you have infants
Make peach fruit leather
add it to your yogurt for a healthy breakfast (oooh, with almonds or walnuts added it is delish!)

See, the possibilities are endless, just sayin'.

So, all you have to do is

Blanch your peaches...


Chop them...


Add about 1/4 cup lemon juice and a Tbsp of the Fruit Fresh powder...

And blend!


Done!  How easy is that.  Now, I like to eat it plain but as you can see then possibilities are endless.


We will do dehydrated peaches tomorrow.

Happy Peaches all,
-Sarah


Thanks so much for stopping by! If you liked Yuen Yarn, check out some of our older posts, Like us on FacebookFollow Me on Pinterest ,visit our ETSY shop or come see our website www.yuenyarn.com.

Friday, September 14, 2012

Peaches.... And in Jam Form

Peach Season...


I love peach season.  I love the smell of peaches, the taste of peaches, the look of peaches, really everything about them!  They are my favorite food on earth.  

So, although we can not grow them here in Montana, I do travel to Washington every year to get them. And when I say get some, I mean cases of them.  

Cases...


Seriously!

So you may be asking yourself, what could you possibly do with all those peaches.  Well I would usually can them, but not this year, we did so many last year that I actually have some leftover, however we did run out of Jam.  And since it is the only jam Soph will eat on her peanutbutter and jelly sandwiches, it was important, necessaryimperative that we make more, and I mean NOW!  (The girl loves her some PB&J, what can I say.)

And then there is me, I can't get enough dehydrated peaches.  It's kind of like crack to me.  but I will blog about that next week.  For now it is the peach jam.

Peach Jam


4 cups finely chopped peaches
2 Tbsp lemon juice
1 pkg pectin (or 1/4 cup of other pectin)
5 1/2 cups sugar


Measure out your sugar before hand so you can add it all at once.


Blanch, peel, and chop your peaches.  

Add your lemon juice to the chopped peaches it will help them keep from browning.


Try this stuff too.  It works great, all I do is sprinkle some on top and mix.


Place peaches, lemon juice and pectin in pot and bring to a full rolling boil.  


Also, as you can see above, we like our jam chunk-less.  I know, its kind of like a sin but we just really like it smooth so I use the immersion blender to get it the consistency we like, HOWEVER, if you go by all the books,  jam should have chunks.  Just so you are aware incase you were concerned.


Add sugar and return to a full rolling boil.  

Allow to boil for 1 minute then remove from heat.  

Ladle jam into your warm jars, place hot 2 part ring on top and place in hot water bath for 15 minutes.  


All done... It will gel as it cools.  Give it time, I promise.  


Happy canning!
-Sarah

Thanks so much for stopping by! If you liked Yuen Yarn, check out some of our older posts, Like us on Facebook, Follow Me on Pinterest ,visit our ETSY shop or come see our website www.yuenyarn.com.