Pages

Tuesday, May 28, 2013

We Got Our Ears Pierced!!!!!

'Punching Holes in Perfeclty Good Ears!'


I can still hear it to this day, 'pinching holes in perfectly good ears!' That's what my dad said she I got my ears pierced for the first time, then when my sister got here done, then when I got mine done again, and again, and, well, you get the picture.

So charly has been asking for almost a year, I think, to get her ears pierced. And every time I have said in the past that, it will poke a little but we can do it if you think your ready...' The answer has been a resounding, 'no!' She was a bit afraid of the pain.


But just before her birthday she started asking more frequently and when I told her that it would pinch for a minute she said it would be ok. So I thought we could do it for her birthday.


It has taken us until recently to finally take her in but we did it this weekend and can I say that I am so proud of my little girl. Not a flinch, not a tear, not even an 'ouwie it hurts'.

We went with a friend of hers and they did it together. It was so exciting for her. She has shown everyone that will look.

Now we are counting down the days until she can change them. Six weeks they said, until we can change them out. We are on day two...

Daddy wanted to have them done when they were infants but I had reservations then about it because I didn't want to hear her cry and I didn't want to take care of them. Then now that she was ready, he had reservations because he didn't want to hear her cry. By I felt like she was old enough to take care of them mostly on her own. Only time will tell I suppose but so far so good. She has been diligent about making sure she cleans the. And turns them 3 times per day.

The little one wanted me to take her picture but when I asked her if she was interested in getting her ears done she said she didn't want 'a pinch'. She was happy with the prospect of still using stick-ons.


Do you have girls and when did you let them get their ears pierced?

We're you worried?

Did they cry?


Thanks for stopping by everyone, come back and visit us again soon,

 -Sarah

 We love that you stopped by and cant wait to see you again soon! If you liked Yuen Yarn, check out some of our older posts, Like us on FacebookFollow Me on Pinterest ,visit our ETSY shop, follow us on Instagram, follow us on twitter, or come see our website www.yuenyarn.com.

Monday, May 27, 2013

DIY Soap Pump From a Mason Jar


Mason Jar Soap Pump

So I have seen these all over the Internet lately and have been just dying to make one!  I really love the old blue Ball jars but could not fathom cutting a hole in the lid of one for some reason. Just me I guess, I mean what else are you going to use it for, right?  But I just couldn't do it. So for now I just used a jar I had lying around but will at least put it in a blue jar with a regular lid at some point I'm sure. 

But here it is: How to make a mason jar pump soap dispenser. 


All you are going to need is:


One mason jar
An old pump (like from a lotion or other soap dispenser)
A glue gun
A screw driver
A hammer
(Or a drill press if you have one)


First poke a hole in your lid with the screw driver and hammer. 


Now pry back the metal until it is big enough to fit the bottom portion of your pump through.  (It's not pretty but it doesn't much matter. It will all be covered!) 


Hot glue the pump to the lid. 


And fill the jar with your favorite soap (or some you have made).


Done!  Aren't they so stinkin' cute!  I really live them. Hey may be Christmas presents this year. It's early enough that I will have time to stock up I think.  


How easy, right?  This is seriously about a 10 minute project. 

Thanks for stopping by everyone, come back and visit us again soon,

 -Sarah

 We love that you stopped by and cant wait to see you again soon! If you liked Yuen Yarn, check out some of our older posts, Like us on FacebookFollow Me on Pinterest ,visit our ETSY shop, follow us on Instagram, follow us on twitter, or come see our website www.yuenyarn.com.


Thursday, May 23, 2013

DIY Reusable 'Paper' Towels

Reusable 'Paper' Towels

I was so excited to make these. I have seen them on ETSY a couple times and, oh swoon...

I finally got my serger in good working order. (You know, the blade sharpened, the tensions set, the oil changed {it's an oil bath model}, and the whole thing just generally checked and lubed.) So now that it's back I have been fired up to start making stuff and this was the first thing I got a chance to do!

I made these the super easy way, with plain old serged edges but if you don't have one I will write the instructions for that at the end.

I made two different types of towels, a thicker one with tericloth on one side and cotton on the other. The second type of towel was doubled up flower sack fabric. (Do you ever use these, they are my absolute FAVORITE dish towels.)  So who wouldn't want them in multiple sizes?  No, just me, well that's ok too.

I had this tericloth sitting around, staring at me, begging me to do something.

And now comes the fun part, picking out a matching fabric to use.


Here's what I went with... cute, right!


Then I took the two pieces of fabric I wanted to use, placed them wrong sides together,


...and serged the edges. How simple right?!?


And for the flour sack ones, same idea.

Now, if you are in the same sad situation I was in about a year ago, serger-less, then you will want to put the right sides together, sew around the edges, leaving an opening to flip it...

Turn it right side out and sew around the edges one more time. This gives it a really nice, more professional, store bought look.


And done.


I used an actual paper towel to measure the size I wanted but truly you can make them any size you think will work for you. How super fantastic.


Now if I was really fancy I would out snaps on them so they would wrap around he towel rack but I didn't, I think I am going to keep them in a basket next to the sink for now. When I find a great way to kind of display them and keep them functional I will let you know!


Thanks for stopping by everyone, come back and visit us again soon,

 -Sarah

 We love that you stopped by and cant wait to see you again soon! If you liked Yuen Yarn, check out some of our older posts, Like us on FacebookFollow Me on Pinterest ,visit our ETSY shop, follow us on Instagram, follow us on twitter, or come see our website www.yuenyarn.com.

Wednesday, May 22, 2013

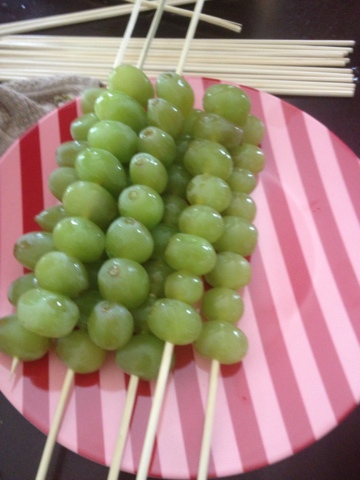
Grape Caterpillars

Caterpillar Grapes

In honor of the Alice in Wonderland theme for the food we also did Catapilars grapes!


This one was super easy, all we had to do was skewer some green grapes and done!


Thanks for stopping by everyone, come back and visit us again soon,

 -Sarah

 We love that you stopped by and cant wait to see you again soon! If you liked Yuen Yarn, check out some of our older posts, Like us on FacebookFollow Me on Pinterest ,visit our ETSY shop, follow us on Instagram, follow us on twitter, or come see our website www.yuenyarn.com.

The Duck Park

Ahh, the duck park. What fun.

Yet another activity with the girls.


There are all sorts of birds from drakes to geese to swans and even babies. They are super cute to watch waddling and swimming around.

The geese are pretty aggressive and my kids don't really care for that but Anne's kids really got a kick out of it. They could have chased and fed and watched the birds for hours.

And I could watch these kids for hours, oh how fast the days go by.

Good times, good times...


Thanks for stopping by everyone, come back and visit us again soon,

 -Sarah

 We love that you stopped by and cant wait to see you again soon! If you liked Yuen Yarn, check out some of our older posts, Like us on FacebookFollow Me on Pinterest ,visit our ETSY shop, follow us on Instagram, follow us on twitter, or come see our website www.yuenyarn.com.


Thursday, May 16, 2013

DIY Window Clings

Homemade Window Clings


That's right, you heard me. Isn't it so exciting.

Let me start off by saying that I bought this kit. I got it at a garage sale and, needless to say, it was old. The kids have been dying to try it out but when we opened the paint tube some of them were all dried out.

Now I knew I had seen on Pinterest a DIY version so I though, really, it can't be that hard, right? Ummm, super easy! Like, one of the easiest things I have done with the kids. Like, I can't believe I haven't done this before now, easy!


So, all your going to need is

Elmer's glue
Dish soap
Food coloring
Glitter (just because)

Ok, the glitters not necessary but when in doubt, glitter it out! But really, were never in doubt...

Add about a TBSP or two of glue to a bowl


A couple drops of dish soap


A drop of food coloring


Glitter


Mix and paint away.


The kids really had a ball painting with it. I did too.


And when it's dry, peel off he plastic and stick on your window. How easy is that.


Thanks for stopping by everyone, come back and visit us again soon,

 -Sarah

 We love that you stopped by and cant wait to see you again soon! If you liked Yuen Yarn, check out some of our older posts, Like us on FacebookFollow Me on Pinterest ,visit our ETSY shop or come see our website www.yuenyarn.com.

Thursday, May 9, 2013

Silk Flower Vases

Super easy vases made out of simple and cheap products!!


First you will need:

Water Noodle
Construction paper 8x11
Cute Silk Flower
Knife
Tape
Small Rock - one that can fit into the middle of the noodle

First cut the noodle to the desired height of the vase, but keep under 11" so the paper will cover. Next, wrap the paper around the noodle and tape.


Now, put the rock in the hole of the noodle in the bottom of the "vase." Lastly, add the flower. I had to cut my flower stem down to fit the vase.

I was able to buy everything at the dollar store!


I was using these for table decorations at my youngest daughter's birthday so I added a number "2" and some glitter.

So easy and cute!

Thanks for reading!
Anne a.k.a. Lil' Sis


Thanks for stopping by everyone, come back and visit us again soon,

 We love that you stopped by and cant wait to see you again soon! If you liked Yuen Yarn, check out some of our older posts, Like us on FacebookFollow Me on Pinterest ,visit our ETSY shop, follow us on Instagram, follow us on twitter, or come see our website www.yuenyarn.com.