Showing posts with label DIY cleaners and household products. Show all posts

Wednesday, March 5, 2014

DIY Antiseptic Ointment

DIY 'Neosporin' Type Ointment

You are seriously going to love this recipe.  I know I do!  I haven't bought Neosporin in ages.


This stuff works great on all sorts of cuts, bruises, scrapes and any other minor injury you can think of.  I even love it for dry cracked hands and feet.

so without further ado, here it is….

You will need:
1/3 cup beeswax
1 cup olive, almond or coconut butter (I used olive oil)
1/4 top Vit E
15 drops tea tree oil
15 drops lavender
15 drops lemon
(and I added 15 drops eucalyptus also) but that is optional


Melt the oil, beeswax and Vit E over low heat until completely melted.


Completely melted…. be patient grasshopper…


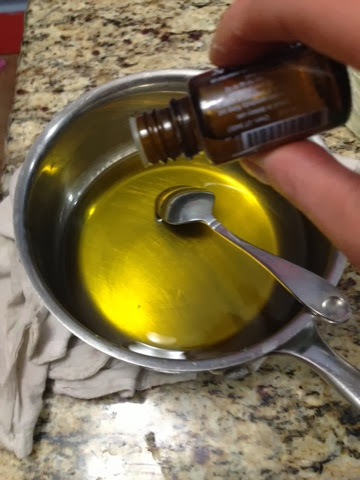
OK, now remove from heat and add your Essential Oils.


Put in a cute container and done.  This is one I had leftover in the basement.  (An old Nutella container.)


Ta-Da!  done-ski…


The lemon, lavender, tea tree and eucalyptus are all known for their antibiotic, antiseptic, and healing properties.


Thanks for stopping by everyone, come back and visit us again soon,

 -Sarah

 We love that you stopped by and cant wait to see you again soon! If you liked Yuen Yarn, check out some of our older posts, Like us on FacebookFollow Me on Pinterest ,visit our ETSY shop, follow us on Instagram, follow us on twitter, or come see our website www.yuenyarn.com.

Friday, January 24, 2014

DIY Body Shop Quality Body Butter

The Best DIY Lotion Ever


I truly LOVE this recipe.  My husband has even told me never to buy lotion again he loves it so much.  It will beautifully moisturize your skin but soak in quickly.

May as well get right to it I suppose…  You will need:

1/4 cup coconut oil
1 cup olive oil
1/2 cup emylsifying wax
3 1/2 - 6 cups water (depending on how thick or thin you like your lotion.  I like about 5 cups since I put it in a pump.)
And essential oils of your choice


These are the essential oils I chose to use but you can use anything You love.

Step 1:

Melt all of your ingredients over low heat and blend with  your stick blender.  (This part is not necessary but I feel like it blend faster this way.  Your call though)


See, all blendy.  Now take it off the stove and add your essential oils.


I like to keep it in pump bottles.  I don't have a problem with keeping it out of the fridge for 6-8 weeks as long as it is in a pump.  If you keep it in a container it will mold faster than that.  (I think it's from everyone putting dirty hands in the jar.)  But like I said, in a pump it works well.

Oops, spilled a little...


Got it now...


And when you rub it in you are going to love how silky your hands feel!  Try it, seriously, you will never go back to store bought lotion.  And the entire process only takes about 20 minutes.

Now be forewarned, it will take up to 24 hours to cool completely and become this consistency.

Thanks for stopping by everyone, come back and visit us again soon,

 -Sarah

 We love that you stopped by and cant wait to see you again soon! If you liked Yuen Yarn, check out some of our older posts, Like us on FacebookFollow Me on Pinterest ,visit our ETSY shop, follow us on Instagram, follow us on twitter, or come see our website www.yuenyarn.com.

Monday, November 4, 2013

DIY Herbal Sleep aid

Insomniac?  We can fix that...


This is one of my very favorite things to make for my family. Whether you believe these things help in the long run or not, this particular blend of scents is one of my favorite, and it's a wonderful thing to fall asleep to.


I always keep it on hand... always!


All you are going to need is a few scents, a couple scraps of fabric, and a carrier oil (but only of you want to keep some in the cupboard for future use).  I like fractionated coconut oil (coconut oil in liquid form) but really any oil will work well, olive oil, almond oil, whatever you like.  Otherwise all you need is a couple scraps of fabric and some essential oils.

The scents you will need are:

lavender
orange
bergamont
and chamomile

(If you cant find all of these lavender and chamomile are the main scents for sleep)


put a few drops of each scent of oil on the fabric scraps


see, they are pretty saturated...


and place the piece of fabric under the fitted sheet on the bed!


I put it on each bed in the house!  Under each pillow even!


I keep it in a bottle with one of the carrier oils I mentioned above in the cupboard.


I keep it labeled with what it's for and what oils are in it for quick access.


Seriously, one of the greatest blends you will come across.  Again, even if you can't find all of the scents, the lavender and chamomile are the ones that will help aid in sleep the most, the other two are just great in combination (both are citrus).  


Thanks for stopping by everyone, come back and visit us again soon,

 -Sarah

 We love that you stopped by and cant wait to see you again soon! If you liked Yuen Yarn, check out some of our older posts, Like us on FacebookFollow Me on Pinterest ,visit our ETSY shop, follow us on Instagram, follow us on twitter, or come see our website www.yuenyarn.com.

Thursday, May 23, 2013

DIY Reusable 'Paper' Towels

Reusable 'Paper' Towels

I was so excited to make these. I have seen them on ETSY a couple times and, oh swoon...

I finally got my serger in good working order. (You know, the blade sharpened, the tensions set, the oil changed {it's an oil bath model}, and the whole thing just generally checked and lubed.) So now that it's back I have been fired up to start making stuff and this was the first thing I got a chance to do!

I made these the super easy way, with plain old serged edges but if you don't have one I will write the instructions for that at the end.

I made two different types of towels, a thicker one with tericloth on one side and cotton on the other. The second type of towel was doubled up flower sack fabric. (Do you ever use these, they are my absolute FAVORITE dish towels.)  So who wouldn't want them in multiple sizes?  No, just me, well that's ok too.

I had this tericloth sitting around, staring at me, begging me to do something.

And now comes the fun part, picking out a matching fabric to use.


Here's what I went with... cute, right!


Then I took the two pieces of fabric I wanted to use, placed them wrong sides together,


...and serged the edges. How simple right?!?


And for the flour sack ones, same idea.

Now, if you are in the same sad situation I was in about a year ago, serger-less, then you will want to put the right sides together, sew around the edges, leaving an opening to flip it...

Turn it right side out and sew around the edges one more time. This gives it a really nice, more professional, store bought look.


And done.


I used an actual paper towel to measure the size I wanted but truly you can make them any size you think will work for you. How super fantastic.


Now if I was really fancy I would out snaps on them so they would wrap around he towel rack but I didn't, I think I am going to keep them in a basket next to the sink for now. When I find a great way to kind of display them and keep them functional I will let you know!


Thanks for stopping by everyone, come back and visit us again soon,

 -Sarah

 We love that you stopped by and cant wait to see you again soon! If you liked Yuen Yarn, check out some of our older posts, Like us on FacebookFollow Me on Pinterest ,visit our ETSY shop, follow us on Instagram, follow us on twitter, or come see our website www.yuenyarn.com.

Wednesday, February 6, 2013

Baby Wipes

DIY Baby Wipes

I must confess, I never made these when the kids were still in diapers.  I just bought them.  Hey, it was quicker and easier and I feel a little like a sell out right now but I was in a different place.  

BUT..........

Now that I can, I really wanted to make some of these because I like to keep them in the car.  They are prefect for cleaning fingers and faces, wiping up spills on road trips, or for that emergent stop on the side of the road potty break.  Soooooooo, what I'm saying is that I have been buying them ever since I had babies in the house and I wanted to try my hand at making them.  I have seen the tuts and reicpes all over the place, I just hadn't done it yet....  so here we are!

Easy peasy everyone, just sayin'.

Here is all you will need:
  • 2 cups water
  • paper towel roll
  • 2 Tbsp baby oil
  • 1/2 Tbsp baby shampoo (or other childrens shampoo)

Cut your paper towel roll and cut it in half.  (I did not see the bit on the tuts about not using a serrated knife until after I did it.  Just thinking it may make less of a mess.)


Now measure out your water and add your shampoo and baby oil.


mix it all up...


Pour it on top of your half of paper towel roll.  (Remember, you will be saving the other half for next time, or making a double batch.)


Once you have poured the water mixture on top the center cardboard roll will come out quite easily.


and start pulling from the center!


Ta-Da!  Like I said, I like to have them in the car so I put them in a ziplock bag so they would fit nice in the glove box but if you are going to use them in the house you can put the wipes in a little nicer container.  Or keep them in a ziplock, whatever really.  


Thanks for stopping by everyone, come back and visit us again soon,

-Sarah

We love that you stopped by and cant wait to see you again soon! If you liked Yuen Yarn, check out some of our older posts, Like us on Facebook, Follow Me on Pinterest ,visit our ETSY shop or come see our website www.yuenyarn.com.